seanbessorealty@gmail.com
    (503) 353-6673

Sean Besso RealtySean Besso Realty

Oregon Real Estate Lives Here

  • About
    • Sean Besso
    • Online Reviews
    • Leave Feedback
  • Buyers
  • Sellers
  • Communities
    • Beaverton
    • Downtown & the Pearl District
    • Happy Valley & Clackamas
    • NE Portland
    • North Portland
    • NW Portland
    • Oregon City
    • SE Portland
    • SW Portland
    • West Linn
  • Blog

10 Dos & Don’ts When Designing a Kitchen Island

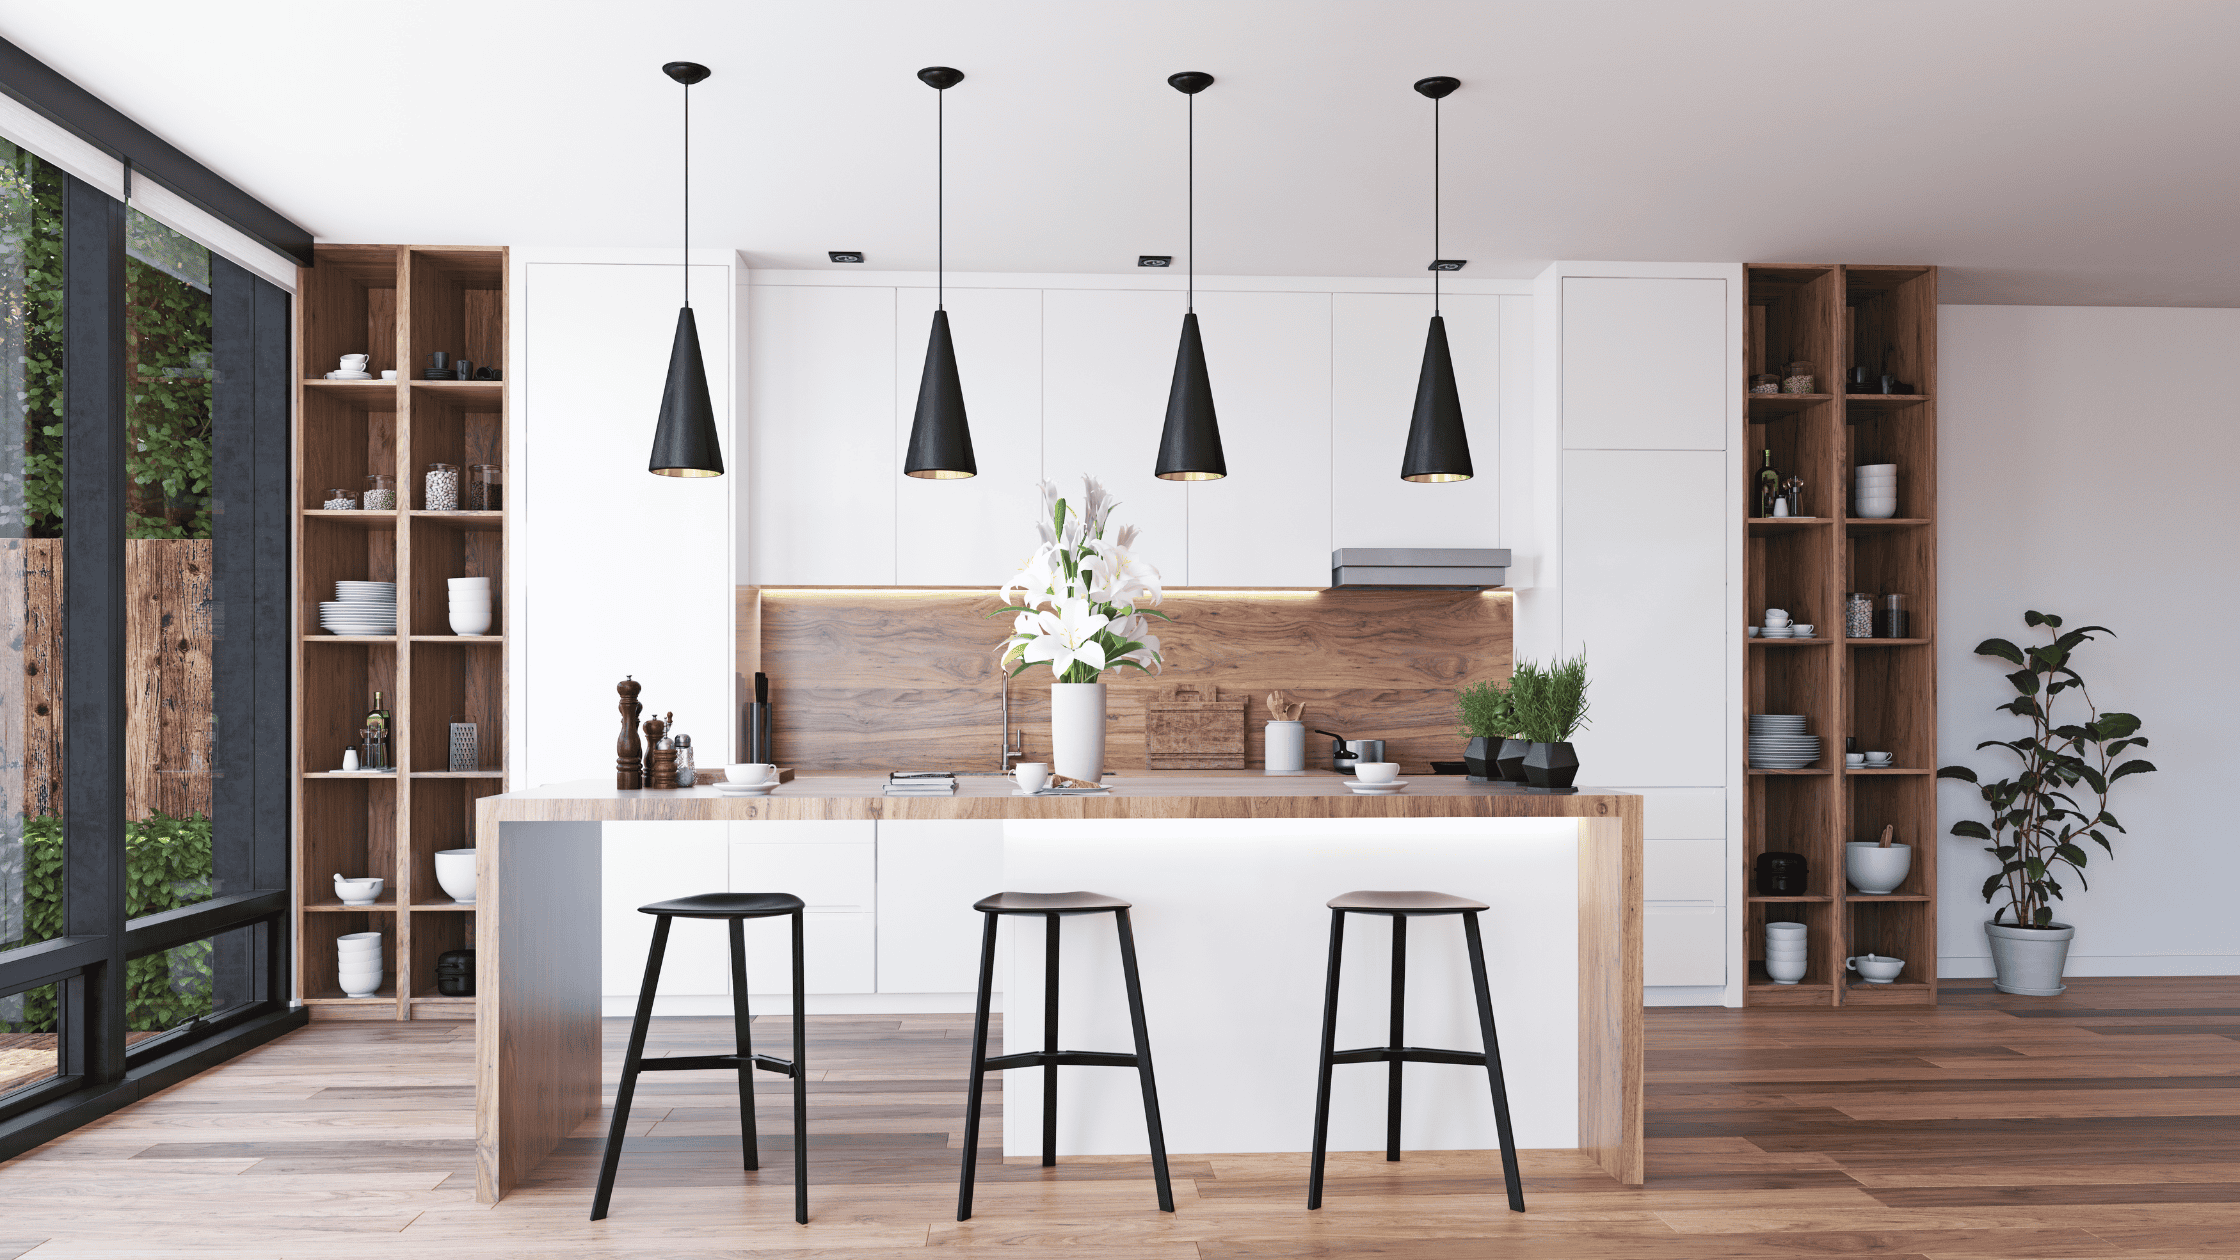
Planning a kitchen remodel? Check out these pro tips for designing a great looking and practical kitchen island.

1. Do Consider How You’ll Use the Island

    • If you like entertaining or eating everyday meals at a breakfast bar, then an island with more overhanging area and less cabinetry or storage underneath might be for you. Think about how you imagine using the bar both every day and on special occasions. Think about whether the sitting area needs to be closer to the fridge and pantry. This is another way of managing who is walking in and out of the kitchen, and who can be kept on the outside edges of the island — for safety as well as to avoid overcrowding in the kitchen.

2. Do Choose a Tough, Easy-Care Countertop Material

    • Kitchens are places of heavy traffic flow and productivity, so a good, durable natural or engineered stone for the countertop is crucial. You’ll also want it to be scratch-resistant and easy to clean — and the same goes for your cabinetry and floorboard materials. Choosing good-quality fixtures such as sinks and faucets is always preferred as they get so much use and need to last.

3. Don’t Forget Power Outlets and Appliances

    • Make sure power outlets and appliances are well-placed so they don’t dominate the appearance of the island, are easily accessed and make the functionality of all sides of the unit work really well. Consider what will be plugged in — it probably won’t just be a hand mixer, but also phone chargers, laptops and the like. A charging drawer for items such as these can be a smart inclusion.

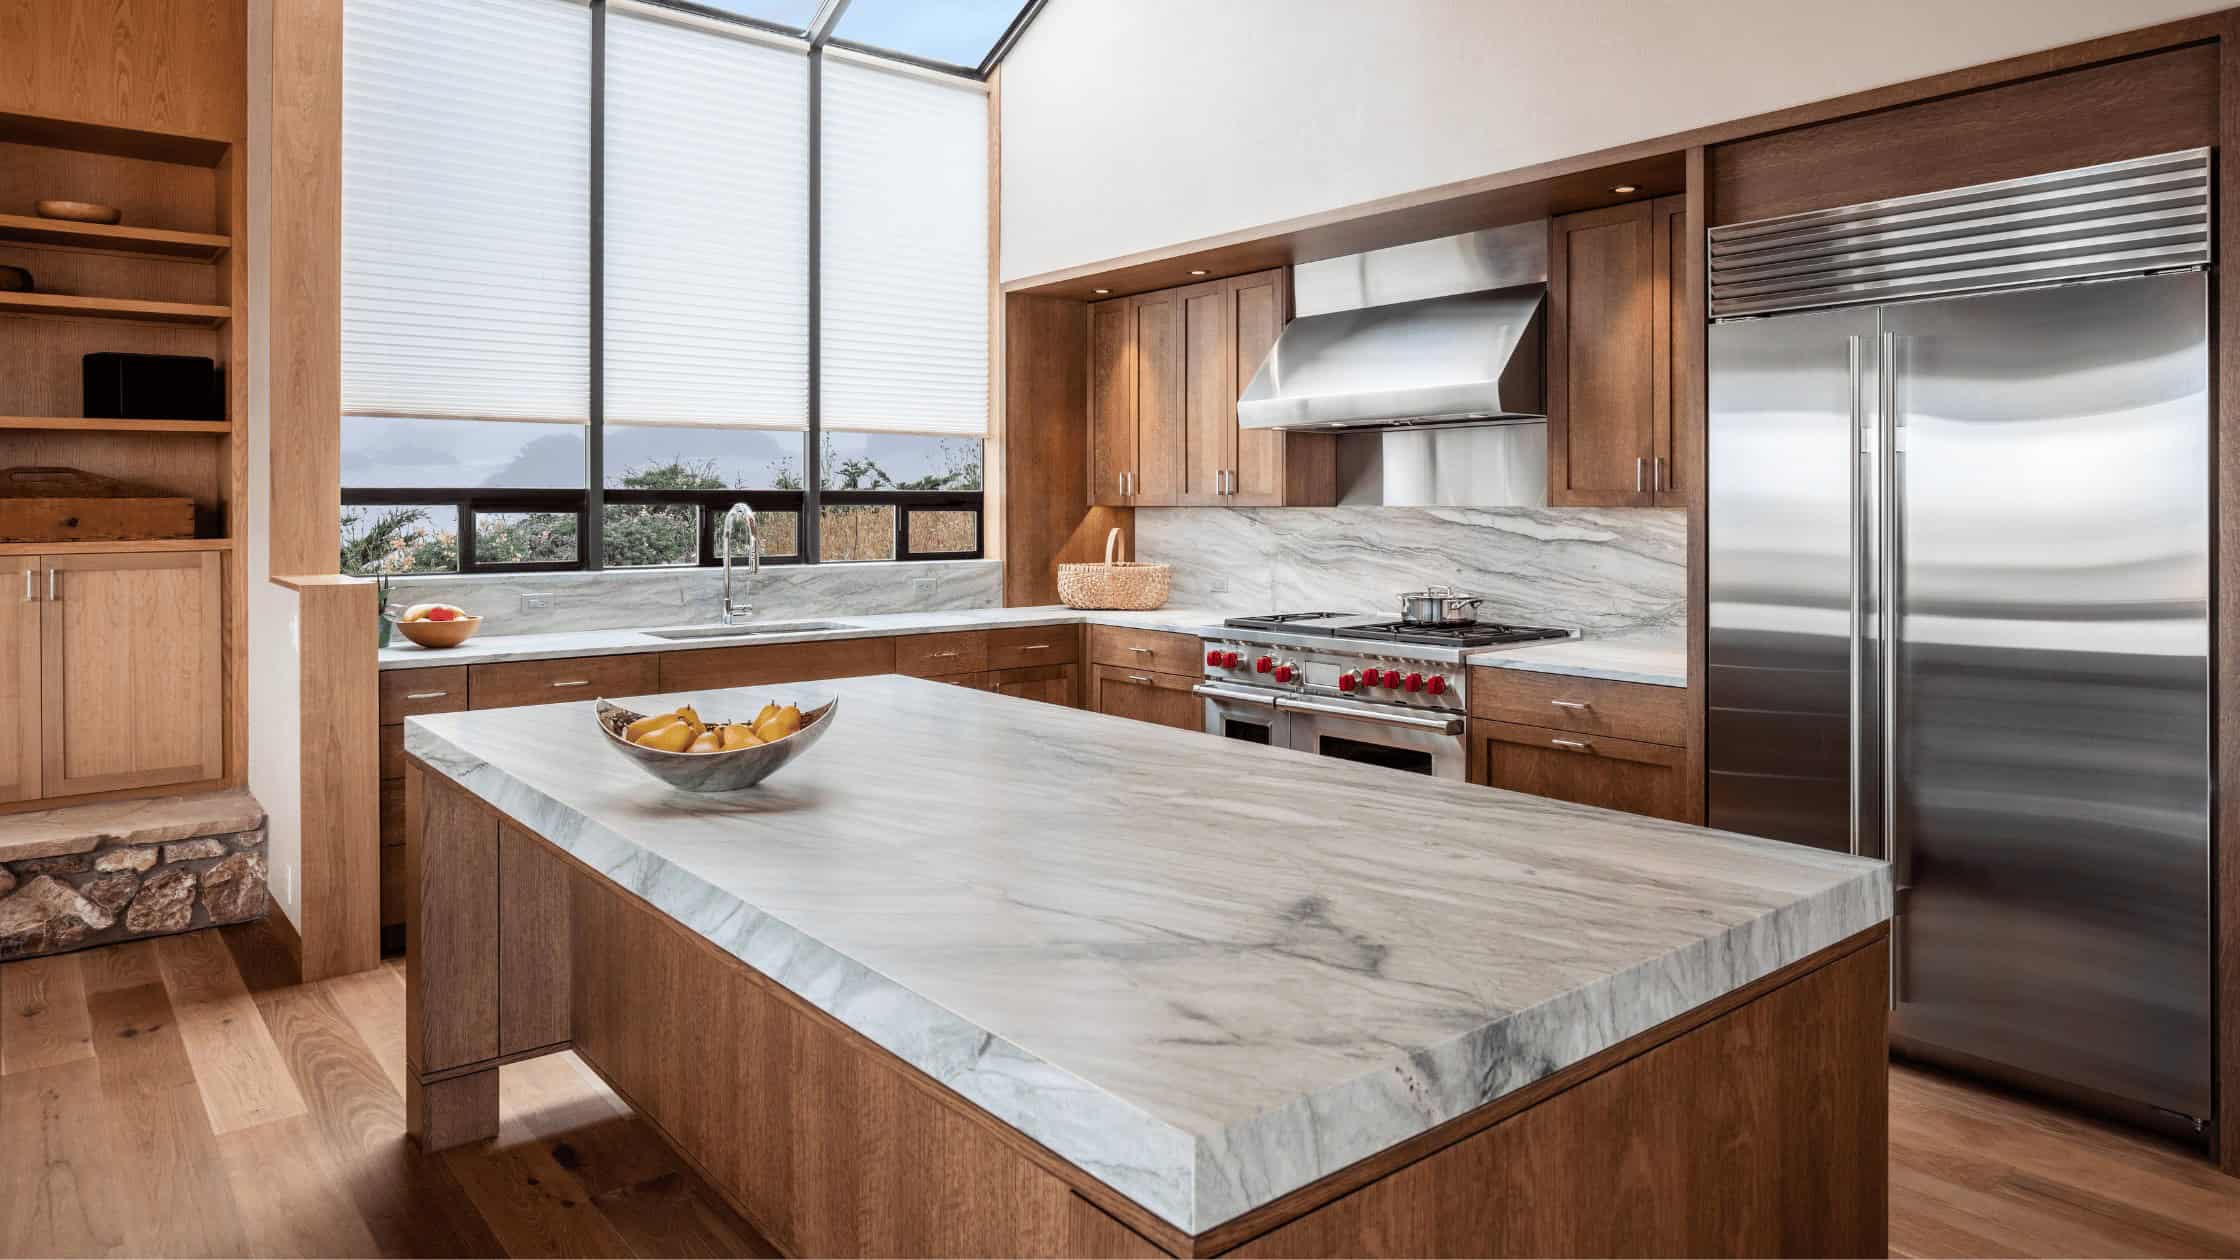
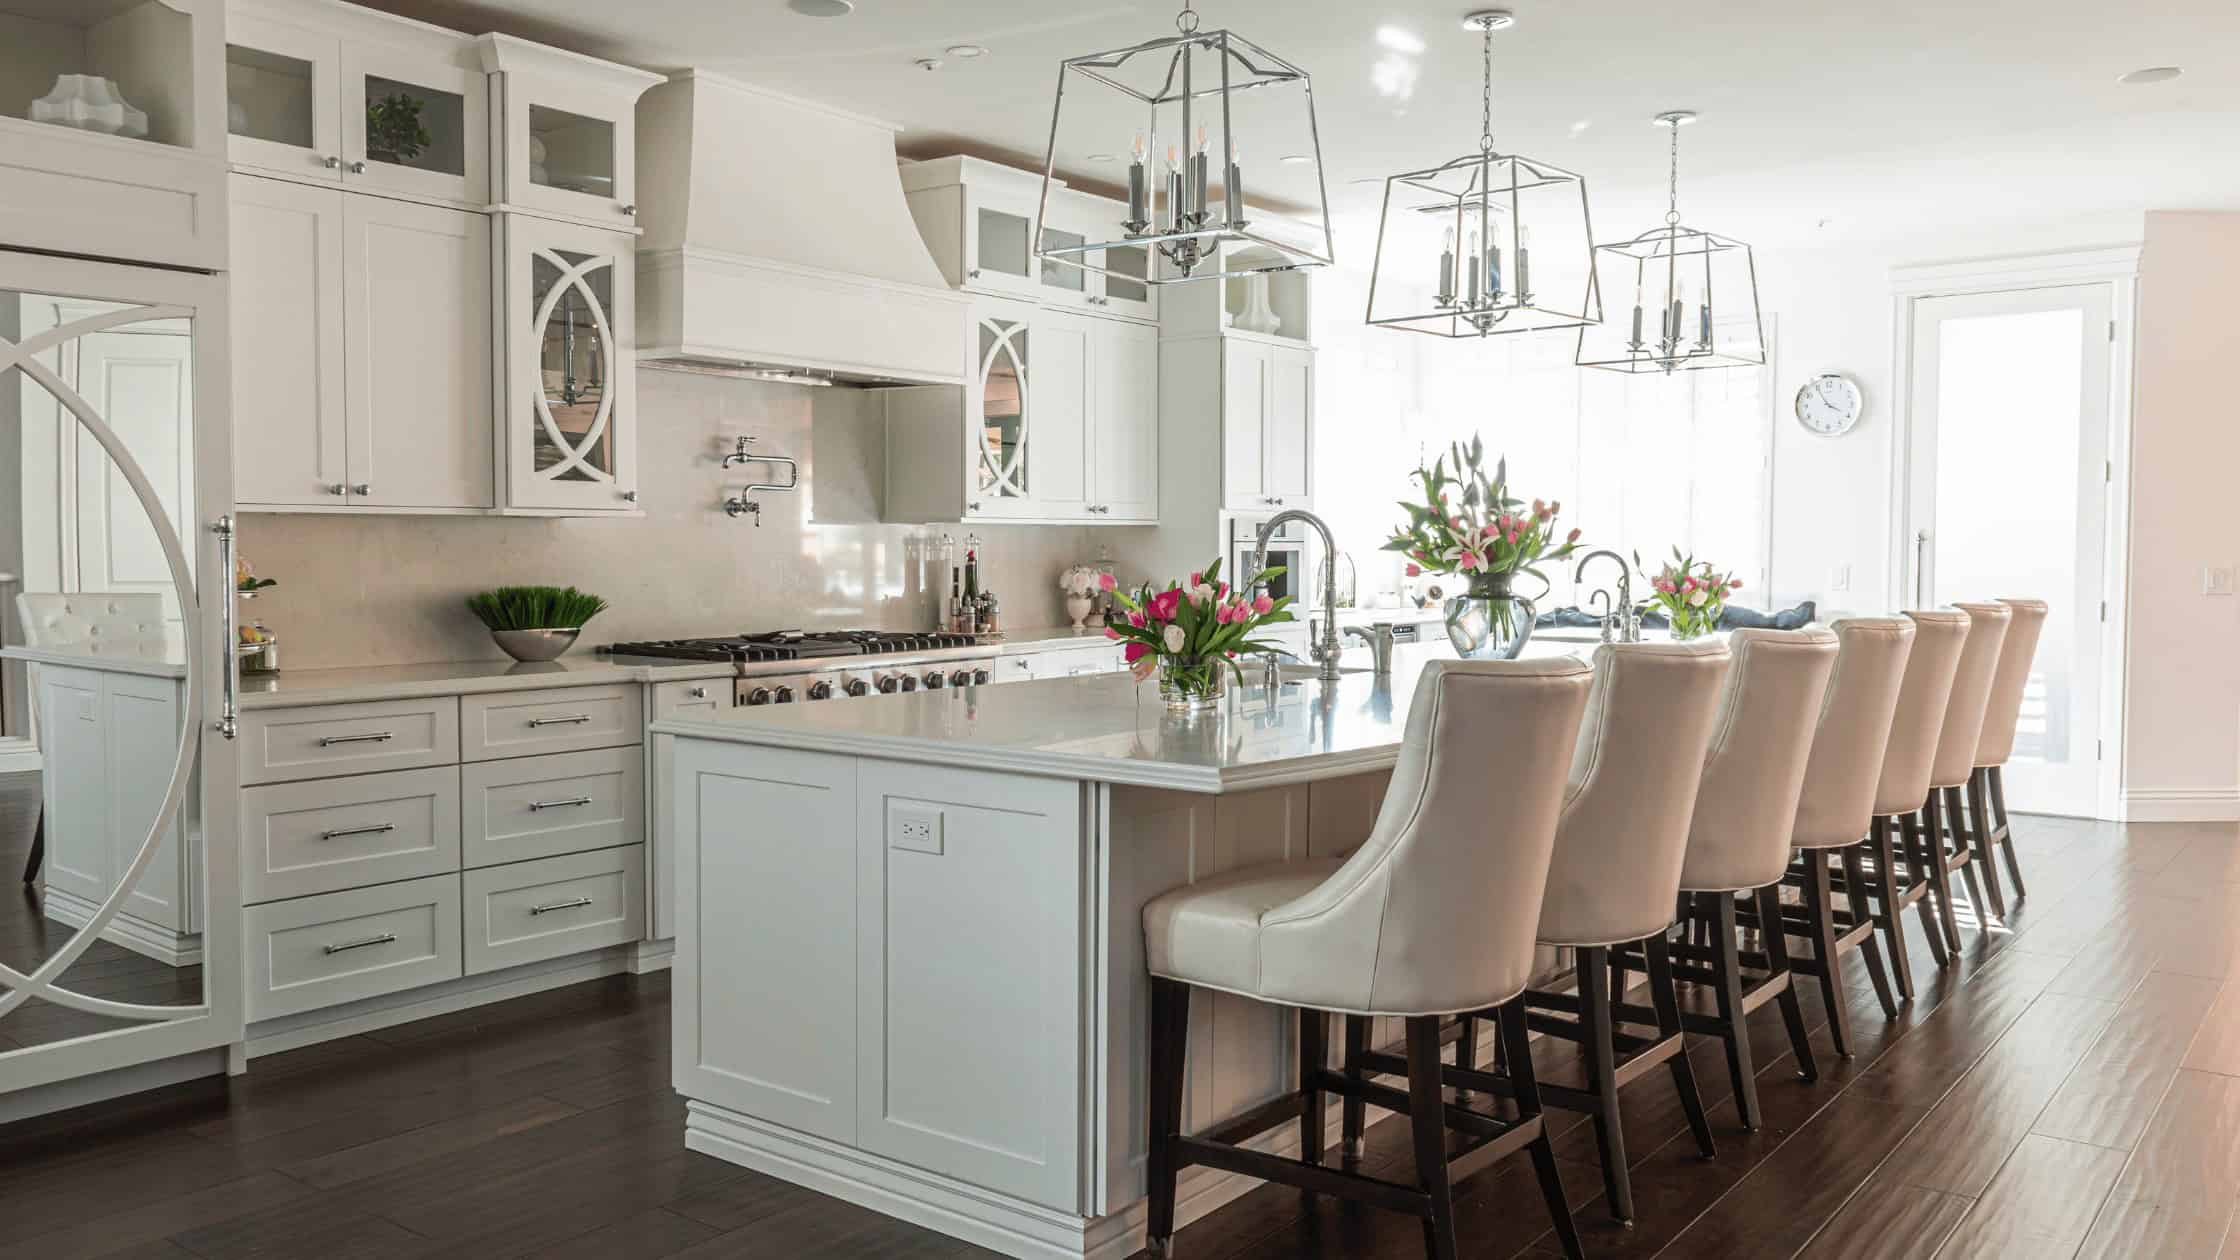
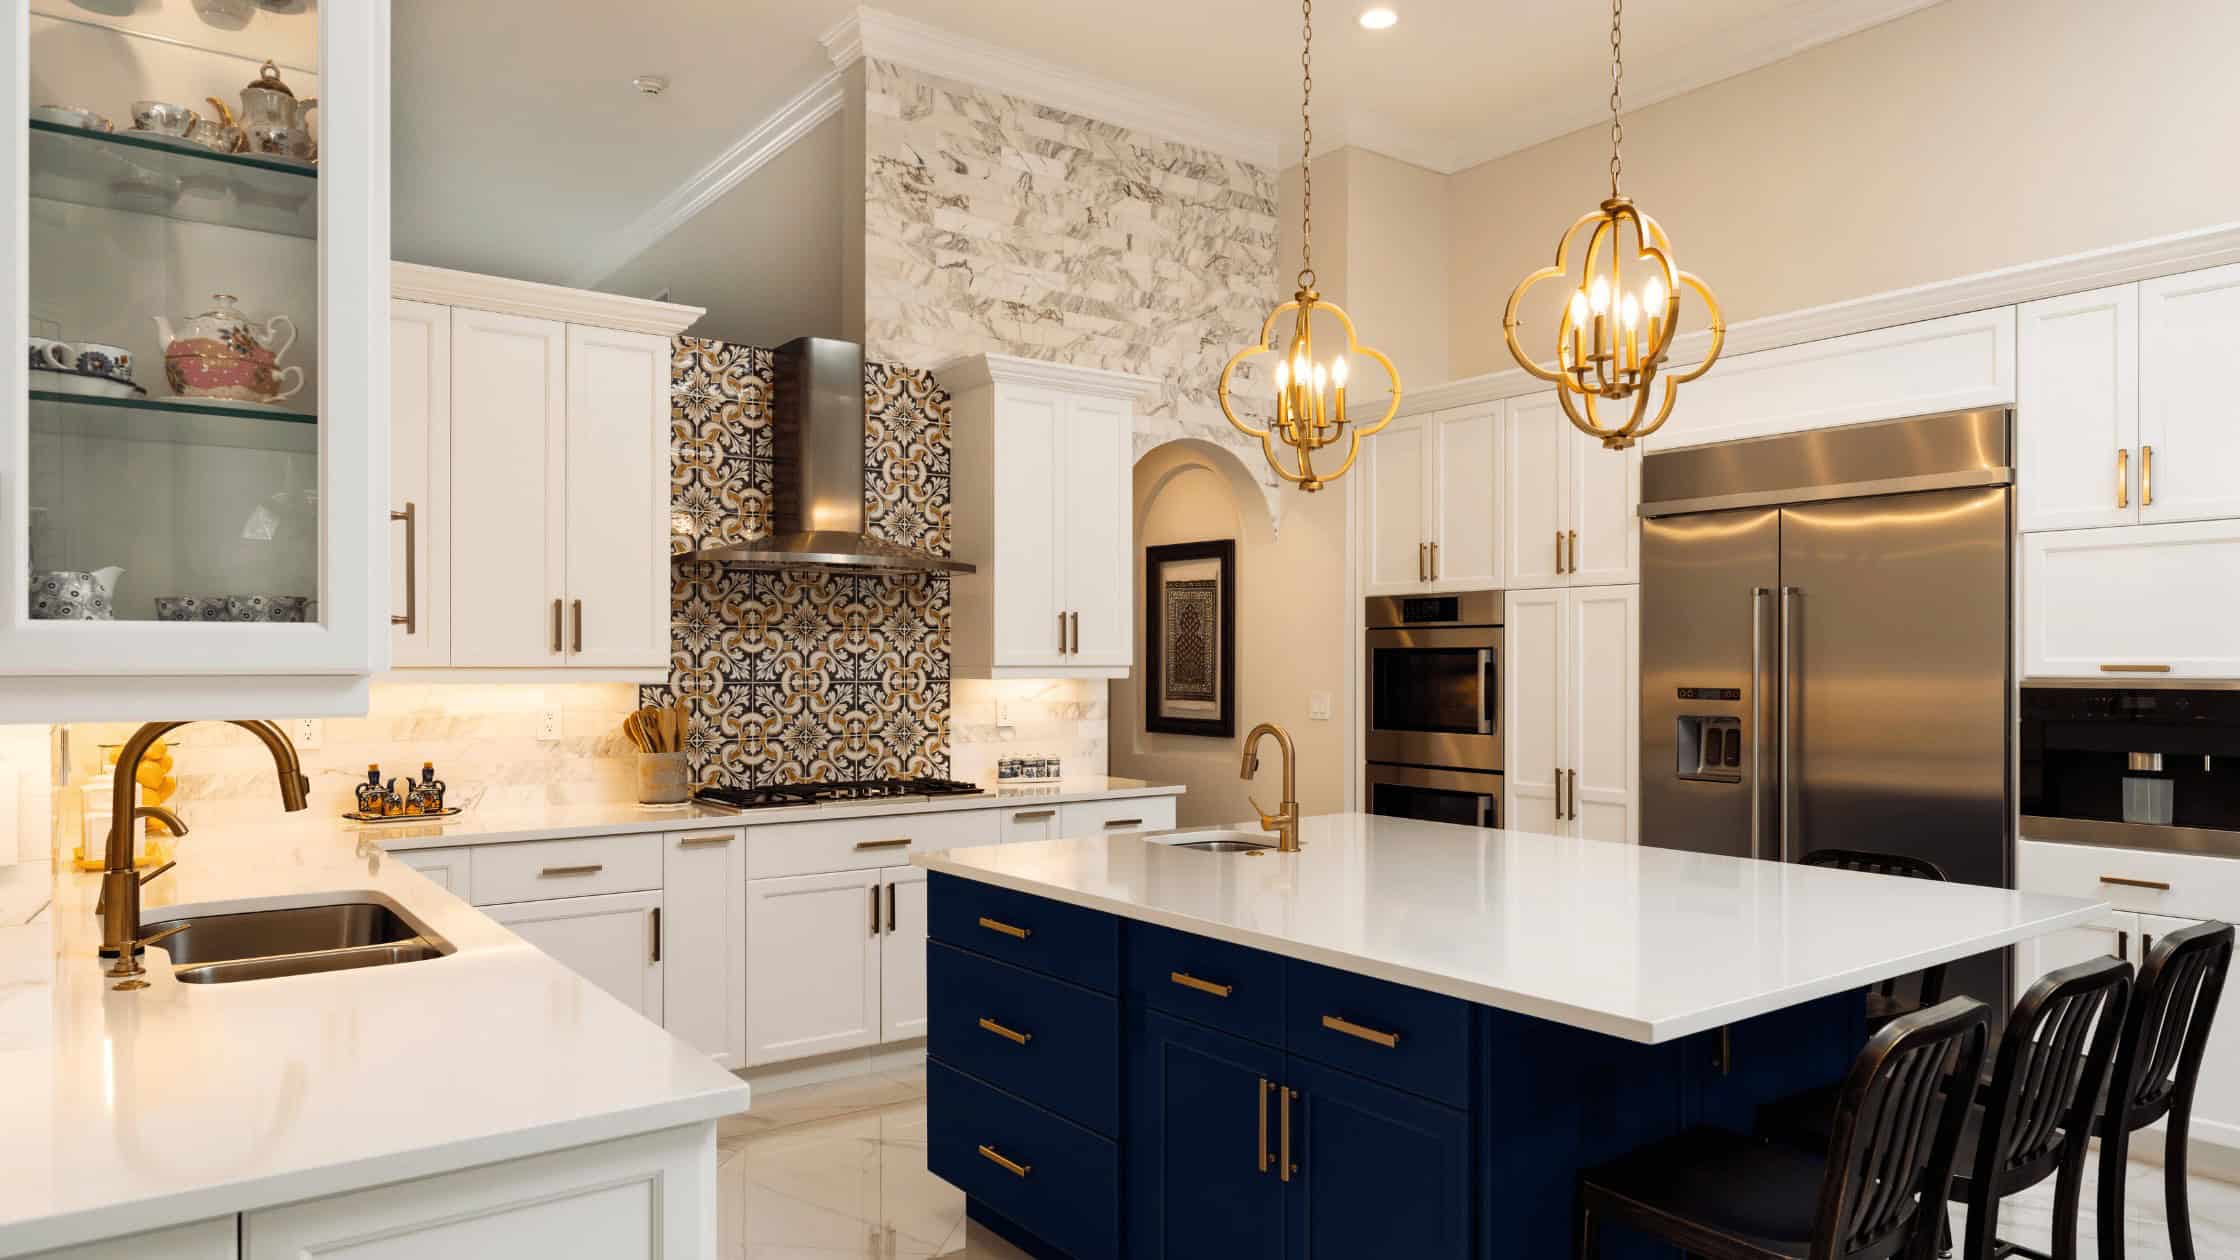
4. Do Make the Island as Long as Possible Without a Seam

    • Slabs of stone come in a range of lengths, but if your kitchen is big enough for one measuring about 118 inches by about 36 inches, you’ll have the perfect-size island for preparing food and entertaining. The maximum length of some brands and materials is 118 inches, so if you choose such a brand or material, keep the length at 118 inches or less, so the countertop can be made in one piece without a seam. Seams on islands are not aesthetically pleasing, so avoid this if you can. A minimum width of about 36 inches will enable you to have bar stools at the back of the island, so your family and friends can perch there to eat or marvel at your cooking.

5. Do Get the Proportions Right

    • Getting the proportions of your island correct lets you work efficiently in the space and ensures that traffic flow is maintained.
      Some key measurements to follow:

      • You want a minimum of 39 inches circulation space around the island.
      • The overall height of the island should be between 36 and 37 inches.
      • The minimum island width would ideally be about 36 inches and the length would be about 47 inches.
      • The countertop should be between three-fourths-inch and about 3 inches thick.
      • If you want to include bar stools around the island, you’ll need 12 inches of under-countertop space.

6. Do Consider Alternatives if You Don’t Have the Room

    • An island that’s too small will result in a cramped workspace, rendering it useless, so ensure you have enough room for it. If you’re working with a smaller space, a better option may be a peninsula unit, which has one short end butted up against a wall.

7. Do Mix Materials

    • Too many kitchens have enormous islands that might provide a lot of countertop space but effectively take over the room and look like a big lump in the middle. Using different materials can break down the scale of an island. However, balance is key — too many materials and details start to look messy and fussy. When you’re choosing materials and colors for your island, make sure they harmonize with any hues in the adjoining rooms.

8. Do Integrate Generous Drawers and a Pull-Out Bin

    • For functionality purposes, it’s a good idea to have your utensil drawer on the island and potentially your bowls and plates too. This gives easy access to the important everyday items you usually use an island for, such as serving up food. Having your trash bin integrated into the island just below your work surface is another important functional element, as it allows you to scrape the scraps straight into the garbage. It also helps you stay part of the action with family or friends when cleaning up the kitchen, as you’re facing them and helps keep your floor mess-free.

9. Do Prioritize Functionality

    • Think about how you’ll be working in the space and include functional fixtures and storage to suit. If this is going to be your main preparation area, include plenty of clear countertop space and easy access to knives and chopping boards. Also ensure that your trash bin and sink are close by.

10. Don’t Be Afraid to Be Bold

    • An island can be a great place to make a statement, so if you’re eyeing some feature cabinetry or a bold cabinetry, then consider this your place to use it.

I hope you all had a wonderful Thanksgiving with your family and friends! Until next month!

Resources: Houzz.com

Posted in: Buying A Home, Home Improvement News, Home Maintenance, Portland, Real Estate Tagged: Home Tips, Portland, Real Estate, Sean Besso, Sean Besso Realty

Houseguest Prep Checklist

The holidays are quickly approaching which means your home might be filled with great food, cozy nights and out of town guests! Follow these easy steps to get your home ready for any upcoming overnight guests.

1. Tidy Up

    • Things don’t need to be perfect! Spend a few minutes gathering stray items and putting them back where they belong. Clear out your mail tray, take out the trash and recycling, and wipe down surfaces.

2. Make the Guest Beds

    • Put crisp, clean sheets on the bed and set out a stack of extra blankets and pillows. While you’re in the guest room, take a moment to tidy up, removing any items that belong elsewhere.

3. Check Lighting and Privacy

    • Change lightbulbs if needed in bedside lamps, and be sure windows have coverings.

4. Clean and Restock the Bathroom

    • While most guests couldn’t care less about a few dust bunnies under the furniture, the bathroom is one place where it’s essential to spend a little extra time cleaning. Clean the sink, mirrors, toilet, shower and tub, and mop the floor. Take out the trash, refill the hand soap and set out fresh rolls of toilet paper and stacks of towels.

5. Get Your House Info Together

    • If you plan to lend your guest a key, be sure to put it on its own keychain that is easy to distinguish from your guest’s own keys. Write down your Wi-Fi password, emergency numbers and any household instructions on a card — and keep a copy on your computer so you can find it easily the next time a guest comes to stay.

6. Stock Up On Morning Essentials

    • Most people are creatures of habit in the mornings and like to have their “usual.” Ask ahead what sort of hot drink or breakfast item your guests prefer in the morning, and put tea- or coffee-making supplies and food items (fresh fruit, cereal) together in one easy-to-access spot on the kitchen counter. Point this out to your guests when you’re giving them the tour, and they can help themselves in the morning without having to wait for you.

7. Kid-Proof Your Space if Needed

    • Have a friend with young children coming? Of course as the parent, your friend will need to be responsible for keeping an eye on the kids, but there are a few things you can do to smooth the way and make things easier on everyone. To prepare for toddlers and young children, move fragile items onto higher shelves, store medications in a secure cabinet and lock cabinets or rooms that you do not want kids getting into. If you don’t mind spending a few bucks on supplies, pick up a pack of outlet covers and use them to fill any unused outlets.

8. Finishing Touches

    • Consider adding some nice finishing touches like the following:
      • Bathroom:
        • Small basket of sample-size toiletries
        • Hair dryer
        • Fresh flowers
        • Bathrobe
        • Spare toothbrush (new in the package)
        • Hook for hanging a toiletries kit
      • Guest Room:
        • Carafe of water
        • Fresh flowers
        • Scented candle and matches
        • Stack of interesting books
        • Power strip to plug in laptop
        • Grab-and-go snack items: chocolate, energy bars, nuts

I hope you find this checklist helpful as we get closer to the holidays! Until next month!

Resources: Houzz.com

Posted in: Buying A Home, Home Improvement News, Home Maintenance, Portland, Real Estate Tagged: Checklist, Fall, Fall Home Maintenance Checklist, Home Maintenance, Home Maintenance Checklist, Home Tips, Portland, Real Estate, Sean Besso

5 Homebuying Tips

It’s best to be prepared before purchasing a home, especially in today’s market! These five helpful tips will help get you started on your homeownership journey.

1. Look at Your Credit

    • One of the first things you should do when beginning the home buying process is to review your credit score. The minimum credit score for most mortgages is around 620.

2. Manage Your Debt

    • After you’ve looked at your credit, see what outstanding debt you have and chip away at it as soon as possible. You can also reach out to a credit counselor to help assist you in managing your debt. They help create a budget and repay your debt.

3. Contact a Mortgage Lender

    • Don’t know any mortgage lenders? Lucky for you, I have multiple resources to help you find a lender that fits your needs. Once you’ve established a mortgage lender, they assist you during the pre-approval process and figure out which loan product works best for you.

4. Put Together a Budget

    • Review your income and expenses. This will help determine how much room you have in your budget for set aside for a downpayment and it’ll help determine what you can comfortably afford when it comes to your monthly mortgage payments. Be sure to consider closing costs and private mortgage insurance (if your downpayment is less than 20%).

5. Consider Low-Downpayment Options

    • There are a ton of various loan products that don’t require 20% or more for a downpayment. Contact your lender (or I can help you find a mortgage lender) and see what options are available for your specific situation.

Bonus Tip: Find a knowledgeable, professional and experienced real estate agent – Like me!

Can’t believe October is right around the corner. I hope you all enjoyed your Summer and have a great Autumn!

Posted in: Buying A Home, Home Improvement News, Home Maintenance, Portland, Real Estate Tagged: Home Tips, Portland, Real Estate, Sean Besso, Sean Besso Realty

September Home Maintenance Checklist

It’s time to start prepping your home for cooler weather! Even though we still have plenty of Summer left, you can get your home ready for Fall with these tasks to do in an hour, over the weekend, or throughout the month. 

1. Maintain the Washer and Dryer

    • Cleaning out the dryer vents can be a job you do yourself, but if you don’t feel comfortable doing so (or if you’ve been putting it off), you may want to hire a pro to do washer and dryer maintenance for you. Washing-machine hoses need to be replaced from time to time, and a cracked hose can cause a leak — which can mean costly damage to your home. Clean dryer vents and hoses will help your machine work more efficiently and reduce the risk of fire.

2. Check Safety Devices

    • Test smoke detectors and carbon monoxide detectors; replace batteries as needed. Check the expiration date on your fire extinguisher and replace if needed.

3. Inspect the Roof and Gutters

    • It’s generally fine to wait until most of the leaves have fallen in autumn to clean out the gutters and downspouts, but giving these areas a quick visual inspection now is a good idea. Pull out any sticks or other debris blocking the gutters, and make note of any worn-out seals around vent pipes and chimneys. If you do not feel comfortable on a ladder, or have a home of two or more stories, hire someone to do a quick inspection for you. Schedule any needed repairs now so that your home will be buttoned up for winter.

4. Schedule Chimney and Furnace Maintenance

    • Make sure your fireplace and heating system are clean, safe and ready to go by having a pro look at them now. Having your chimney cleaned will also ensure that you don’t try to start a fire when an animal family (or an old nest) is inside. And if you don’t have a chimney cap yet, speak with your chimney sweep about adding a one. The metal cap with screened sides can prevent critters from getting in and helps protect your roof from burning embers.

5. Cozy Up with Warm Layers

    • Have you felt that first nip in the air yet? When you do, think about swapping out lighter-weight bedding for flannel sheets and fluffy duvets. Bring added warmth to the other rooms in your house with throws and pillows in rich fabrics like wool, velvet or faux fur. Thicker area rugs and curtains not only feel cozier, but they also can actually help your home feel warmer — and cut down on your energy bills.

6. Order Firewood

    • Whether you use a wood-burning stove or fireplace for actual warmth or just for coziness, now is a good time to order a delivery of firewood. If you can help it, don’t store large quantities of wood directly against the house, which can encourage pests, but do keep it protected from rain and snow beneath a shelter.

7. Clean Leather Furniture

    • It’s important to know whether your leather furniture has a finish before treating it with any products, so check labels or look up the item on the retailer’s or manufacturer’s website before you begin.
      • For unprotected leather (also called aniline), less is more when it comes to cleaning: Wipe with a clean, dry cloth orone slightly dampened with distilled water.
      • For protected leather (also called semianiline or pigmented), you can make your own cleaning solution by adding a few drops of mild nondetergent soap to distilled water, or use a commercial leather cleaning product. Apply with a microfiber cloth.

8. Add Weatherstripping

    • Newer double-pane windows may not need weatherstripping, but it will help most older windows retain heat and stop drafts. Check areas with previously applied weatherstripping and remove or replace as needed.

9. Remove Window A/C Units

    • If you use window air-conditioning units, later this month will be the time to either remove them or cover them outside with protective insulation. Removing the units is the better option because this will allow you to close the windows, minimizing winter heat loss. If you choose to leave them in over the winter, be sure to pick up insulating covers made for this purpose and securely attach them outside.

10. Freshen Up Your Fall Wardrobe

    • If you’ve bought new clothes recently, take this opportunity to sort through the rest of your wardrobe and remove pieces you no longer wear. Collect clothes that need repair and move summer clothes to an out-of-the-way spot so that your fall wardrobe can be front and center. Polish shoes, remove pilling from coats and sweaters, and clean out handbags and totes.

I hope you find this checklist helpful as we get closer to the colder months. Happy Labor Day!

Resources: Houzz.com

Posted in: Buying A Home, Home Improvement News, Home Maintenance, Portland, Real Estate Tagged: Checklist, Fall, Fall Home Maintenance Checklist, Home Maintenance, Home Maintenance Checklist, Home Tips, Portland, Real Estate, Sean Besso, September, September Home Maintenance Checklist

Garden Survival 101: How to Deal with a Heat Wave

As most gardeners know, hot temperatures can cause major stress and sunburn to our outdoor plants. Below are some five tips to keep your plants thriving in the summer heat and hopefully, these methods will decrease any heat wave damage done to your garden. 

Definitions of what constitutes a heat wave vary, with most stating that it’s a period of abnormally high temperatures for that particular region. Some specify that a heat wave lasts at least two days, while others begin at five days. One definition I found stated that a heat wave is when temperatures are 9 degrees Fahrenheit above the average high.

​Plants in containers are most susceptible to extreme heat, as the air temperatures can “cook” the roots as well as the tops. Shallow-rooted plants such as annuals are particularly sensitive to the effects of a heat wave, while most succulents are fairly tolerant.

Now, let’s start with the most important tip –

TIP #1: Water, Water, and More Water

    • High temperatures increase the rate that water is lost to the atmosphere from a plant’s leaves, resulting in wilting and sunburn damage. You’ll need to increase the amount of supplemental irrigation that they receive. It’s best to do this the day before the heat wave arrives. When you water your plants is also important. Irrigating them in the middle of a hot day isn’t effective, as your shrubs and perennials are devoting all their energy to dealing with surviving the heat, not to taking up water. The best time to water plants is early in the morning, when temperatures are lower, which will help carry them through the day. Avoid overwatering, which is also harmful to plants. If the soil is soggy, skip the extra watering session, as it will do more harm than good.

TIP #2: Shade is Your Garden’s New BFF

    • On a hot summer’s day, we all look for a shady spot where temperatures are a few degrees lower. Unfortunately, plants can’t move toward the shade, but we can bring it to them. Nurseries and big-box stores carry landscape burlap and shade cloth, which can be placed on top of plants to screen them from the sun. Other temporary shade methods include using a portable shade canopy to shield an area of the garden from the sun. Even a single patio chair can protect a low-growing plant. If you have container plants, place them on rollers so that you can move them as needed to a shady area.

TIP #3: Avoid Pruning

    • It’s tempting to prune away sunburned growth, as it isn’t attractive, but put away those pruners. Although the outer foliage may be damaged, it’s protecting the interior of the plant by providing shade. Wait to prune away sun-damaged growth until temperatures return to normal. For extra safety, wait until summer is almost over before pruning away in case of the arrival of another heat wave.

TIP #4: Add a Layer of Mulch

    • Hot temperatures don’t affect just the parts of the plant that are above the ground; they also impact the roots. Adding a layer of mulch around trees, shrubs and ground covers will help keep the soil several degrees cooler while preventing it from drying out. Apply mulch about 3 inches thick around your plants, spreading it to the drip line (where the branches extend out to) and taking care to keep it 6 inches away from the trunks of trees.

TIP #5: Skip the Fertilizer 

    • As we talked about earlier, plants devote all their resources to surviving a heat wave. Because of this, they can’t spare the energy to take up fertilizer, which remains in the soil and can “burn” the plant. After the scorching weather has abated, go ahead and resume your regular fertilizing schedule.

Stay cool this upcoming week! Until next month!

Resources: Houzz.com

Posted in: Buying A Home, Home Improvement News, Home Maintenance, Portland, Real Estate Tagged: Home Tips, Portland, Real Estate, Sean Besso, Sean Besso Realty, Summer

Ways to Cool Down Your Home Without Central Air

Whether your home has central air conditioning or not, these helpful tips will keep you cool these summer months and save on energy bills. 

1. Air Circulation

    • A great way to get air circulating is by forcing air flow with a fan/box fan in your window. Night cooling also helps to naturally decrease the temperature in your house and exchange hot interior air for cooler outdoor air. Ceiling fans and standing fans placed near windows at night can help force the air movement when there is no breeze and a small temperature difference. During the day the added air movement from fans can help the perception of heat, which is tied to humidity.

2. Block the Sun from Reaching Your Windows

    • The more shading you can include on the outside, the better. Consider a simple overhang made with brackets and wood slats to block your windows from the intense summer sun. Solar-control window films can offer UV protection and reduce the amount of heat gained from solar radiation. Compared with some elaborate shading systems, these could be a less expensive alternative. Even simple bamboo blinds can block a good portion of sunlight without completely sacrificing daylight.

3. Add Interior Drapes, Blinds or Shades

    • Once the heat from the sun’s rays passes through the glass of a window, that heat is in the house and will need to be ventilated to escape. To keep your floors and walls from soaking up that heat from direct rays and emitting it throughout the day, it can help to add another layer of protection between the window and the main thermal mass of your home. Sheer window treatments are a nice way to mitigate direct sun rays to the floor but maintain soft, natural daylight. Plus, white reflects sunlight better than colors.

4. Transition Your Bed Into Summer Mode

    • I don’t know about you, but I feel summer heat the most when I’m trying to sleep. Reduce the amount of bedding you have and stick to natural fabrics like linen or 100 percent cotton. Synthetic blends don’t breathe enough to release all the heat we generate during the night. Have a porch or balcony? Consider transitioning it into a sleeping porch. Depending on your home or apartment and security concerns, you may have a little exterior screened-in space that can be used like a sleeping porch. You could have a little daybed with light linens for nights when it’s comfortable enough to sleep in open air.

5. Turn Off Major Appliances During the Day

    • To help maintain those cooler temperatures during the day, reduce anything that generates heat in your house or apartment. For example, don’t use the dryer or oven and try not to open the fridge too often. The more you open it, the more the motor has to work to cool it down again, and the heat generated from that work will be released back into your apartment.

6. Stay Hydrated

    • What may seem like the most simple solution is usually the solution looked over the most often. Stay hydrated! Drinking water also helps regulate body temperatures.

I hope you all have a wonderful rest of your June! Until next month!

Resources: Houzz.com

Posted in: Buying A Home, Home Improvement News, Home Maintenance, Portland, Real Estate Tagged: Home Tips, Portland, Real Estate, Sean Besso, Sean Besso Realty, Summer

May Home Maintenance Checklist

April shower bring May flowers! Here is a home maintenance checklist that will help get your spaces ready for the nicer weather we have ahead of us. Tick these 10 items off your to-do list so you can get to the good stuff like hanging out around the grill, kicking back on the porch and savoring the season.

1. Get Ready for Grilling Season

    • Giving your grill a deep cleaning before the start of the season will help it work more efficiently and prevent flare-ups. Clean the grates and interior with a grill brush and wash the exterior with warm, soapy water. Clean and organize your grilling tools (tongs, spatula, skewers) and pick up charcoal or propane if needed. If you have a gas grill, be sure to check the fuel line for cracks and clean out any clogged burner holes.

2. Check Outdoor Lighting

    •  Make sure all outdoor lights are in working order, including porch lights, landscape lighting and motion-sensing security lights. Replace bulbs or schedule repairs as needed.

3. Maintain/Repair Garden Paths

    • Create neat edges, pull weeds, fill in gravel paths with fresh gravel and replace or reposition broken steppingstones.

4. Tend to Your Potted Plants

    • If you have potted plants that stay indoors over winter, bring them out once the danger of frost has passed. To help your plants acclimatize, find a protected spot out of direct sun for the first several weeks outdoors.

5. Inspect Kitchen & Bathroom Fixtures

    • Keeping an eye on these areas can help prevent costly water damage and repairs later on. Make a plan to re-grout or re-caulk around counters and tile as needed. If you come across any slow leaks, have these repaired as well.

6. Clean Walls & Touch Up Paint

    • Use a dusting attachment on your vacuum or an electrostatic duster to remove dust from walls, paying special attention to corners and baseboards. For a deeper clean, wipe down walls with warm, soapy water after dusting. Rinse with clean water, using a lint-free cloth. Touch up paint as needed on interior walls and trim.

7. Clean Items on Open Shelves

    • Infrequently used items stored on open shelves can get pretty grimy over time. For items with a thin layer of dust, swipe with an electrostatic duster. If there is a thicker layer of dust, of if the items are in the kitchen (where cooking grease can be an issue), wash each piece in a tub of warm, soapy water. Rinse and allow everything to dry before replacing.

8. Add a Relaxing Porch or Backyard Feature

    • Make your home’s porch or backyard more inviting with a cohesive piece of furniture. Furniture pieces to consider include a porch swing, rocking chairs, outdoor umbrellas or curtains, etc.

9. Clean Your Laundry Room/Area

    • Run your washer with a speciality washing machine cleaner or white vinegar on a hot water cycle. Thoroughly wipe the rubber rim inside the washer and dryer doors and remove lint from the dryer vent with a vent brush or vacuum attachment. Clean countertops, mop floors and restock supplies.

10. And As Always – Check Your Smoke and Carbon Monoxide Detectors

    • Smoke alarms should be tested at least once a month and replaced every 10 years — even if they still appear to be in working order, according to the U.S. Fire Administration. Test smoke detectors and carbon monoxide detectors; replace batteries as needed. Check the expiration date on your fire extinguisher and replace it if necessary.

Whether you want to get your backyard ready for Memorial Day weekend or want to wrap up some spring cleaning, I hope this checklist helps you tackle some house chores! Until next month! 🙂

Resources: Houzz.com

Posted in: Buying A Home, Home Improvement News, Home Maintenance, Portland, Real Estate Tagged: Checklist, Home Maintenance, Home Maintenance Checklist, Home Tips, January, January Home Maintenance Checklist, Portland, Real Estate, Sean Besso, Winter, Winter Home Maintenance Checklist

Quick Tips for Beginner Gardeners

Spring has sprung and now it’s time to bust out your gardening tools and enjoy the fresh air. So many rewards come with gardening, but starting your very first garden can feel very overwhelming. Luckily, gardens can be surprisingly forgiving and the best way to learn is by diving in. Here are 10 tips to help get a new garden off on the right foot.

1. Jot Down Your Goals, Style & Design Ideas

    • Start searching the web and social media platforms (like Pinterest, Instagram, TikTok, etc.) and write down any ideas that inspire or speak to you. See if you can find a common theme that incorporates your favorite design ideas. Some themes could include an Asian-inspired Zen garden, simple yet cozy Cottage garden, or an Modern Industrial garden. Once you’ve locked down a theme/style, take a moment to jot down the activities and features you imagine enjoying in your landscape. If you have children, you may need a lot of open space for running around. Or perhaps you dream of relaxing in the middle of a big wildflower meadow — whatever it is, write it down.

2. Explore & Get to Know Your Gardening Site

    • Consider some of the following ideas that will help you get familiar with your property before starting your garden: Take a leisurely stroll around your property with a notebook and make a rough sketch of the existing planting areas. Create a garden “map” and note which areas get the most sun and which are shaded. Buy a simple soil test from your local garden center and it will tell you whether your soil is well-balanced in nutrients and pH. If you plan on growing fruits, veggies, herbs, etc. be sure to test your soil for any lead. You can send your soil samples to the Lead Safe America Foundation for a free lead test. Make note of your existing plants, fences, and paths and decide what is staying and what is going.

3. Make a Plan

    • No matter how big or small you want your garden, having a plan is key. If you’re not sure which plants to buy, visit a local nursery and take photos of the plants you like and might want to put in your garden. Look at the tags and note when they bloom, sun requirements, and water requirements. Pulling this information together into a sketched-out plan takes a little extra time, but will make for a more successful garden in the end. Choose plants that bloom in different seasons for year-round color, and be sure to pick plants with similar sun and water requirements to plant together.

4. Start Small

    • The bigger the garden, the more time and energy it will require to maintain. Examine what you want (say, a vegetable garden) and then scale it down (for example, plant one raised bed rather than six). You can always expand next year! This is also true for purchasing plants. It’s easy to get seduced by the bountiful plants at the nursery and come home with far too many. Remember, planting takes time, so buy only what you can comfortably get into the ground within the next day or two.

5. Acquire Basic Gardening Tools

    • Having the proper tools makes garden chores more pleasant — but don’t think you need to buy out the store on day one. Just a few tools and supplies should keep your garden running smoothly. The basics include: gardening gloves, shovel, trowel and weeding tool, long garden hose and spray nozzle, hand pruner, metal rake, and a leaf rake.

6. Mix Up Perennials & Annuals

    • A common beginning gardener mistake is to grab too many plants from the “annuals” section at the nursery, making for a garden that dies back within a single year. For longevity and color, go for a mix of perennials (plants that come back year after year) and annuals (plants that bloom and die within a single season).

7. Repeat Plants for a Cohesive Garden

    • One great way to give your garden a professionally designed look is to repeat the same plants and hardscaping materials in different places throughout the landscape. Avoid picking one plant of each type, as this tends to appear jumbled — even in a wild English cottage-style garden, plants look best when repeated or planted in clusters. The same goes for other materials: Choose just a few hardscaping materials for paths, pots, planters and outdoor furniture, and repeat, repeat, repeat.

8. Seeds + Starts = Affordable Mix!

    • Starting an entire garden from seed can save money, but it can also be incredibly frustrating. Purchasing only started plants is not only expensive, but it also may limit your choice of what to grow. The best option is usually a combination of the two: Pick up some started seedlings at your local nursery and start some of your own from seed. Good plants to start from seed yourself include lettuce, beans, radishes, marigolds, cosmos, sunflowers, and zinnias.

9. Grow What You Like

    • I know this may sound simple, but it’s something that even the most experienced gardeners tend to look over and forget. Just because it’s squash season, if you don’t like it, don’t grow it! Try devoting extra garden space to family favorites like snap peas, radishes, Tuscan kale and mini pumpkins for Halloween.

10. Further Your Garden Education

    • Seek out local workshops to learn more about gardening and connect with other gardeners in your community! Check plant nurseries, community gardens and botanical gardens in your area for free or low-cost workshops on a wide range of topics like using native plants, attracting pollinators, composting, container gardening, and creating a water-wise garden. Gardening is a lifelong learning experience, and even the most seasoned gardeners are learning all the time — so don’t beat yourself up if it seems that there’s too much to know. Just begin somewhere and take it one season at a time. The wonderful thing about gardening is that there’s usually room for do-overs.

I hope you all have a wonderful rest of your March! Until next month!

Resources: Houzz.com

Posted in: Buying A Home, Home Improvement News, Home Maintenance, Portland, Real Estate Tagged: Backyard, Home Tips, Portland, Real Estate, Sean Besso, Sean Besso Realty, Summer

Common Decorating Mistakes to Avoid

Decorating a living room can be a tough job! Choosing color schemes, furniture, making sure everything is proportionate and balanced is a lot to keep in mind so here is a list of the most common styling errors that people make and how to steer well clear of them. 

1. Sofa is Too Large or Too Small

    • Selecting a sofa that’s the wrong scale for your living room is the biggest mistake people make. Keep in mind that a sofa can look entirely different once it leaves the showroom and enters your living room. Color also plays a big part in how big/small the sofa appears. For example, a dark sofa with a floor length skirt can look extremely heavy in a small living room space. You can avoid this mistake by measuring up your living room, the other furniture in the room, and the sofa you have your eye on before you buy. Consider the style of sofa. In a compact living room, consider a sofa on legs and with narrow arms to give the illusion of more space. If you have a large room, you might consider a more substantial sofa, such as one with wide arms that sits close to the ground.

2. Hanging Artwork Too High

    • Artwork is often hung too high to be properly seen or appreciated. Gallery style is the only hanging style that allows for artwork to be hung higher than eye height as it combines artworks of different sizes to create a wall of art. Make sure your artwork is hung at eye height, with the middle of the piece approximately 63 inches from the floor.

3. Making Your TV the Focus of the Room

    • Many homeowners will choose an oversize television that is too big for the room and then center all the furniture around it, forgetting that the living room is for entertaining and conversation too. The television can be an integral part of your living room without being the focus of it. The key is to conceal it as much as possible and create a space that performs dual functions as a watching zone and relaxing/social space. A built-in wall of cabinetry or a ready-made cabinet with shelves are two smart ways to detract attention from a television or conceal it altogether. Use the open sections of the cabinetry to house books, photos, ornaments and other interesting things that will draw the eye from the television and add personality to the room.

4. Rugs That Are Too Small

    • A great rug can be the making of your living room. It grounds your furniture and, in an open-plan space, defines the living area, but the most common mistake people make is purchasing a rug that is too small for the space or the furniture in it. A too-small rug sits separately from the furniture in the room, making the space look disjointed and feel uninviting. You can avoid this by measuring your living room and the main pieces of furniture before shopping. Ideally, the rug you choose should be big enough to allow the key pieces of furniture to sit on top of it. If your living room is not big enough to allow everything to sit fully on your rug, choose a style that is slightly wider than your sofa and allows for the front legs of your sofa and any smaller furniture pieces (such as side tables and stools) to sit on it.

5. Coffee Tables That Are Too Small

    • Just like rugs, it’s a common mistake to purchase a coffee table for your living room that is too small or doesn’t fit with the rest of your furniture. A too-tiny coffee table can also prove a practical challenge. If the coffee table is too small for the sofa or chairs, it will often get positioned far away from them in an effort to create a sense of balance, which makes it hard to reach. Remember this rules of thumb: your coffee table should be between half to one-third of the length of your sofa. Look to position it about 16 to 20 inches from the sofa and armchairs so you can reach it comfortably.

6. Putting All Your Furniture Against One Wall 

    • Pushing all your living room furniture up against the walls is another common styling mistake people make. When the sofa is against one wall, with a pair of armchairs against another, and the coffee table stranded in the middle of the room where nobody can reach it, the result is a dull room that feels a little like the waiting room in a doctor’s surgery. A good solution is to move the furniture deeper in the room and set up conversation zones that will instantly make the room feel cozier and more welcoming. The arrangement that works best will depend on the shape and size of the room. You may decide to put the sofa against a wall, with a pair of armchairs opposite it and a coffee table in between them. Or, if your living room is spacious, you may choose to place the furniture near the middle of the room, with space around it to move about.

7. Bad Lighting

    • With lighting, the problem comes down to either too much or too little light, and not enough options to allow you to use the space for different functions. Look to create a smart, layered lighting scheme in your living room consisting of different light sources, such as a ceiling pendant, table and floor lamps and up or down lights. Setting them on dimmers allows you to alter the lighting levels and mood to suit the occasion. A layered lighting scheme also allows two people to use the space at the same time for different tasks without disturbing each other. For example, one person might be watching television with the lights dimmed, while another person is reading in the corner of the room with a floor light on, There are three types of lighting you’ll want to include: ambient lighting — a gentle wash of light that allows you to move around safely; accent lighting — to highlight special features in the room, such as art; and task lighting — for reading and other tasks where you need to see clearly.

Have you ever made a decorating mistake that you regret? Let me know in the comments!

Until next month!

Resources: Houzz.com

Posted in: Buying A Home, Home Improvement News, Home Maintenance, Portland, Real Estate Tagged: Decor, Decorating, Home Decorating, Home Remodel, Home Tips, Portland, Real Estate, Remodel, Sean Besso, Sean Besso Realty, Summer

Interior Design Trends for 2024

Whether you’re planning a gut renovation or simply looking to complete a budget-friendly home refresh, this list of 2024’s biggest home trends is sure to help!

Peach & Apricot Colors

    • Described as “radiant with warmth and modern elegance”, Pantone’s color of the 2024 “Peach Fuzz” will be popping up in all sorts of different home spaces. Peach and apricot colors can easily be paired with neutrals and naturals, but also looks excellent with greens, purples and blues for a vibrant contrast. Start small with throw blankets, pillows, rugs, etc. or bump it up a notch and paint an accent wall in peach or apricot.

Wallpaper in Unexpected Places

    • Wallpaper has definitely made a comeback! Bring a little fun and surprise to your space by placing wallpaper in unexpected places like coat closets, linen closets, small bars, and half baths. Give your small spaces a little glow up because every space in a home should feel special, even if you don’t see them everyday.

Fluted Details

    • Fluted elements like below bring a distinctive texture and visual interest to your surfaces and finishes. It’s extremely versatile across different design types and adds a certain sophistication that makes the space feel considered.

Metal Finishes

    • Metals can amplify whatever vibe a room is already giving. Bright aluminums and silver are going to make a splash this year after years of gold and black dominating metal hardware and accessories. Adding metals to your home doesn’t always have to be in hardware or accessories though. Try using them in your furniture pieces or light fixtures.

Woodgrain Millwork

    • This year, we’ll see more and more people wanting to expose their original wood millwork. Opt for rich woods like walnut, maple, and mahogany over paint-grade millwork.

Romanticism

    • Unspool your ribbons! Romanticism isn’t just for the 19th century (or the 1980s!). It’s a carefree style that exudes confidence, pinks, reds, florals, lace, and ribbons which can make a space feel sensual and provocative. Try this trend out with floral pillows, botanical textiles, and jewel tones.

Vintage Furniture

    • I don’t think vintage furniture will ever go out of style. Although investment pieces like vintage furniture may take a toll on the wallet, the quality and longevity you’ll get out of them will far surpass big box store “fast” furniture.

Intimate Dining Areas

    • “In the past decade, there has been a noticeable shift in preferences—many now favor separating the kitchen from the dining room, moving away from the once-popular open concept. This change reflects a growing inclination, reminiscent of today’s popular period dramas, to create more intimate dining experiences for gatherings with family and friends. This often involves blocking direct access to the busy kitchen, immersing guests in beautifully designed dining rooms.” — Rayman Boozer, Apartment 48

Quiet Luxury

    • The idea of quiet luxury is to use innovation and timeless elegance to transfer a space that inspires and elevates everyday living. Sustainable materials, discreetly integrated smart technology and a revival of classic design elements evokes nostalgia while embracing the modern era.

Statement Tiles

    • We’ll see a lot more statement tiles this year, especially in showers. By using a statement or accent tile, you’ll break up any monotony in these mostly plain spaces.

That’s all for now – I hope you all had a wonderful month!

Resources: Good Housekeeping

Posted in: Buying A Home, Home Improvement News, Home Maintenance, Portland, Real Estate Tagged: Home Tips, Home Trends, Interior Design, Portland, Real Estate, Sean Besso

Posts navigation

  • « Previous Page
  • 1
  • 2
  • 3
  • 4
  • 5
  • Next Page »

Quick Search

About Sean Besso

Whether you are an experienced investor or a first time buyer, I can help you in finding the property of your dreams. Feel free to browse through my profile and please don't hesitate to reach out for any of your real estate needs! Meet Sean...

Client Reviews

Impressed with his social, professional and articulate manners. Very responsive to requests. Easily explains situations and information in a format that can be quickly understood and processed by individuals outside of the real estate profession. Enjoyed the experience and learned so much.
- Dan Shoop


More Testimonials

Get in Touch

Sean Besso Broker
Licensed in the State of Oregon
2207 NE Broadway Ste. 100
Portland, OR 97232
Call Us: (503) 444-9008
© 2026 · Sean Besso Broker

Privacy

Privacy Policy | Sitemap | DMCA

Agent Reputation | Real Estate Website Design

Marketing | Order Order
Log in